Help protect Africa's 

Earthly Eating: Gluten-free Cheesy Scones

Earthly Eating: Gluten-free Cheesy Scones

EARTHLY EATING

Image: You Magazine


We all know we should be doing our part to save the planet. But what does that mean when it comes to food? It can be easy to get overwhelmed with all the different eco-friendly choices. Each month, we bring you delicious, nutritious, and eco-friendly recipes that our staff members or followers love! This month’ s recipe is Gluten-free Cheesy Scones!

Gluten-free Cheesy Scones


Ingredients
  • 1 ½ cups of gluten-free flour
  • 2t sugar
  • 1T baking powder
  • ½t salt
  • Pinch of Cayenne Pepper
  • 160ml grated cheese (mature Cheddar)
  • 2 eggs
  • 80ml oil
  • 100ml milk
Instructions
  • Preheat oven to 180oC (350oF)
  • Prepare your baking tray
  • Sift the flour, salt, sugar, baking powder and Cayenne Pepper together
  • Add grated cheese
  • Mix well
  • Whisk the eggs, milk and oil and add it to the dry mixture. Fold into the flour until the mixture is a stuff dough
  • Shape the dough into balls and place on baking sheet.
  • Bake for 25 minutes until done (golden brown)
  • Notes:  Sprinkle grated cheese and paprika onto the dough before baking.
  • Serve with butter or cream, and cheese.

Serve and Enjoy!

Earthly Eating: Gluten-free Cheesy Scones

Earthly Eating: Honey – roasted vegetables with hazelnut and goat’ s cheese

EARTHLY EATING


We all know we should be doing our part to save the planet. But what does that mean when it comes to food? It can be easy to get overwhelmed with all the different eco-friendly choices. Each month, we bring you delicious, nutritious, and eco-friendly recipes that our staff members or followers love! This month’ s recipe is Honey – roasted vegetables with hazelnut and goat’ s cheese brought to you by our very own canine handler Shay.

Honey – roasted vegetables with hazelnut and goat’ s cheese

20m prep time ·  40m cook ·  Serves 8

These honey-roasted vegetables are the perfect accompaniment for your festive meal.

Ingredients
  • 1/3 cup honey
  • 1/4 cup dry sherry
  • 4 small parsnips, peeled, halved lengthways
  • 2 bunches baby carrots, trimmed, scrubbed
  • 2 bunches small beetroot, peeled, halved
  • 1 tbsp extra virgin olive oil
  • 1/2 cup roughly chopped skinless hazelnuts, toasted
  • 50g goat’s cheese, crumbled
  • 1/2 tsp sumac
  • 1/4 cup chopped fresh parsley leaves
Instructions

Preheat oven to 200C. Line a baking tray with baking paper.

Place honey and sherry in a small bowl. Stir until honey has dissolved. Pour into a large roasting pan. Add parsnip and carrot. Turn to coat. Place beetroot on prepared baking tray. Drizzle beetroot with oil and season with salt and pepper. Roast vegetables, turning halfway through, for 40 minutes or until parsnip is golden and sticky.

Transfer vegetables to a serving platter. Sprinkle with hazelnuts,  goat’ s cheese, sumac and parsley. Season with salt and pepper.

Serve and Enjoy!

Earthly Eating: Gluten-free Cheesy Scones

Earthly Eating: Healthy Air Fryer Eggplant And Chickpea Salad

EARTHLY EATING

Nachos


We all know we should be doing our part to save the planet. But what does that mean when it comes to food? It can be easy to get overwhelmed with all the different eco-friendly choices. Each month, we bring you delicious, nutritious, and eco-friendly recipes that our staff members or followers love! This month’ s recipe is Air Fryer Eggplant and Chickpea Salad brought to you by our very own graphic designer Jo Bert.

Healthy Air Fryer Eggplant And Chickpea Salad

On the lookout for nutritious salads? You’re in the right place! This air fryer eggplant and chickpeas salad is jam-packed with wholesome ingredients like parsley, onion, cucumber and tomatoes. The best part? It’s high in protein and fibre.

Ingredients

Eggplant, Avocado oil, Salt,  Turmeric, Chickpeas,  Parsley,  Onion, Cucumber,  Tomatoes, Lemon, Sumac

Instructions

To be honest, most of the work goes into chopping, dicing and slicing the salad ingredients. I recommend doing all that prep work beforehand or while the eggplant is air frying to make your life easier. That way, everything is ready to go for assembly.

  • To begin with, cut the eggplant into small, even-sized cubes. I find it helpful first to cut the eggplant in quarters lengthwise and then slice it into small cubes.
  • To release the moisture from the eggplant, place the cubes on a large plate or bowl, season with salt, and let them sit for 30 minutes. This enables the salt to draw out the moisture from the eggplant.
  • After 30 minutes, you will actually notice the moisture droplets on the surface of the eggplant cubes. Use a clean dishcloth or paper towel to gently press and blot the eggplant cubes dry. This is a crucial step because if there’ s too much moisture on them, they won’ t air fry well – resulting in soggy eggplant.
  • Now it’ s time to season! Add avocado oil and sprinkle the cubes with turmeric. Then, toss to coat thoroughly.
  • Next, place the eggplant in the air fryer baskets, making sure not to overcrowd the pieces. Air fry the eggplant at 400F for 15-20 minutes, shaking the basket halfway through cooking
  • Once the eggplant cubes are cooked, remove them from the air fryer and place them in a large bowl.
  • Now it’ s time to assemble the chickpea salad. Begin by adding chickpeas, cucumber, tomatoes, parsley, onion, lemon and sumac to a large bowl and toss to combine.
Tips
  • When preparing eggplant, cut it into small cubes so that they cook evenly and don’ t get soggy.
  • Season the eggplant with salt, avocado oil and turmeric (or your desired spices) for extra flavour.
  • You want to avoid overcrowding the air fryer basket. This will help ensure that they cook evenly and get crispy. You could either send the eggplant in two batches or if you have a dual air fryer, utilize both baskets for best results.
  • If you’ re using canned chickpeas, drain and rinse them well before adding them to the salad.
  • Add fresh herbs like parsley, mint or cilantro (coriander) for extra flavour.

Earthly Eating: Gluten-free Cheesy Scones

Earthly Eating: Ultimate Nachos

EARTHLY EATING

Nachos


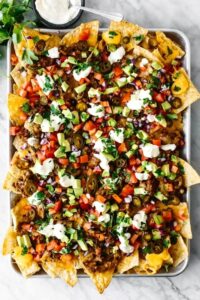
Each month, we bring you delicious, nutritious, and eco-friendly recipes that our staff members or followers love! This month’ s recipe is Ultimate Nachos from Shadi Henrico, our Conservation K9 expert.

Ultimate Nachos

For the vegetarians: Mexican favourites! Swap the ground beef for soya mince, or add spoon-fulls of fruity salsa for a refreshing twist. Treat this tray of nachos as a blank canvas and let your creative juices flow!

There’ s nothing quite like a tray overflowing with nachos for an entertaining and playful appetiser. The base starts with everyone’ s favourite – crunchy tortilla chips. The chips then get layered with all the savoury toppings you can imagine – spiced mince,  cheese, beans, pickled jalapenos, avocado chunks, salsa – you name it!

Preparation time: 15 minutes


Cook time: 15-20 mins

Ingredients

This recipe is a basic formula for a solid tray of loaded nachos – tortilla chips, meat, cheese, beans, and simple, fresh taco toppings. It may seem like a lot, but once you start adding everything onto the sheet pan, it’ s a cinch. Here’ s what you’ ll need.

  • Mince: Beef is my default for a classic nachos recipe. But you can also use chicken or soya if you’ re not big on beef.
  • Cheese: The key here is to use grated cheese for the perfect melted, gooey texture. But the type of cheese is up to you. I personally like a mix of cheddar and mozzarella.
  • Pickled Jalapenos: This is completely optional, but I do find that pickled jalapenos add a deliciously tart and moderately spicy contrast.
  • Fresh Toppings: I’ m using a combination of diced tomatoes, red onion, avocados, and sour cream.
Instructions
  1. Some of the best appetisers don’ t require a lot of effort. And this ultimate nachos is one of them. The only cooking you need to do is to saute the mince and refried beans. Then everything else goes into the oven for baking as you prep the fresh toppings. But first, get your oven preheated to 200°C.
  2. Cook the mince. Add the mince to a skillet over medium heat and cook for about 5 minutes. Then add the taco seasoning and cook for five extra minutes until it’ s browned.
  3. Cook the refried beans. Add the refried beans and water to the skillet and stir everything until combined.
  4. Layer on a sheet pan. First, spread the tortillas on a rimmed sheet pan and layer on the mince mixture, cheese, and jalapenos. Bake for 10 to 15 minutes, until the cheese is melted and the edges of the tortilla chips are golden.
  5. Add the toppings. Immediately add the diced tomatoes, onion, avocado, sour cream, and cilantro. Your nachos recipe is ready to serve!

Earthly Eating: Gluten-free Cheesy Scones

Earthly Eating: Red wine braised Mushrooms

EARTHLY EATING

Each month, we bring you delicious, nutritious, and eco-friendly recipes that our staff members or followers love! This month’ s recipe is Red wine braised Mushrooms from our People in Conservation Specialist, Jenny Botha.

Red Wine Braised Mushrooms

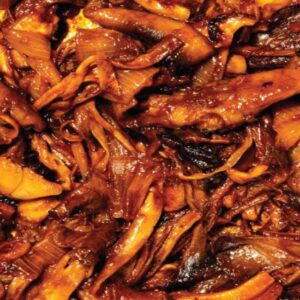
Braising is an easy, quick and approachable way of creating layers of flavour and texture – by searing (and therefore slightly caramelising) the exterior of a vegetable before cooking it through in a flavourful liquid. The easy process results in tender and deeply savoury vegetables that become buttery and silky in texture in under an hour. This recipe uses mushrooms which, once crisped and cooked in tomato, red wine and vegetable stock, mimic the richness and depth of meat-based ragout. I like to use a combination of portobello and oyster mushrooms, as I find they add texture and complexity to the dish, but you can also use shiitake or king oyster – make sure you shred (if using kind oyster) or slice them (if using shiitake) thinly.

Preparation time: 15 minutes

Cook time: 45 mins

Serves 4

Ingredients

  • 200 g portobello mushrooms
  • 200 g oyster mushrooms
  • 2 tbsp + 1 tbsp olive oil, separated
  • ½ tsp salt
  • 2 shallots, finely sliced
  • 2 cloves garlic, smashed
  • 50 g tomato paste
  • 60 g red wine
  • 200 ml vegetable stock
  • 1 bay leaf
  • â…› tsp freshly ground black pepper

To serve:

  • 10 g chives, finely sliced
  • Plant-based parmesan optional
  • Mashed potatoes, polenta, or crusty bread

Instructions

  • Start by preparing the mushrooms. Finely slice the portobello mushrooms and set them aside. Next, use your hands to pull the oyster mushrooms apart into shreds.
  • Heat 2 tbsp of olive oil in a large, heavy-set pot over medium heat. Add the mushrooms to the pot and stir to coat them in the oil. Let the mushrooms cook undisturbed, for 6-7 minutes, until golden brown on the heat-facing side.
  • Stir the mushrooms, then let them cook for 5-6 more minutes, undisturbed, until crisp and golden brown in most places. Stir in ¼ tsp salt, then transfer the mushrooms into a bowl. Set them aside.
  • Add the remaining tbsp oil to the pot and heat over medium heat. Add the finely sliced shallots, and sauté them for 7-8 minutes, until soft. Add the smashed cloves of garlic and continue sautéeing for 4-5 more minutes.
  • Add the cooked mushrooms back into the pot, and stir to coat them in the shallots. Stir in the tomato paste and cook it for 2-3 minutes – until it darkens in colour and starts sticking to the bottom of the pot.
  • Add the wine and stir to deglaze the pot. Cook the wine down for 2-3 minutes, then add the vegetable stock, ¼ tsp salt and the bay leaf.
  • Lower the heat to medium-low and simmer the mushrooms in the stock for 12-15 minutes – until the liquid has reduced and created a thick sauce.
  • Add the black pepper, then taste for seasoning and adjust to taste. Cover the pot and let the braised mushrooms sit for 5-10 minutes before serving. Remove the bay leaf and the cloves of garlic.
  • Serve the mushrooms with mashed potatoes, polenta or toasted bread, and top them with chopped chives and parmesan.